Yesterday's post reminds me that there are lots of things I still haven't gotten around to showing you, so this week will be all about catching up. Remember those saris? I did manage to knock out one Titanic dress from that stash, then got stalled halfway through a second one. But before I show you the completed dress I should show you the corset I made to go under it! I no longer own this corset; due to fitting issues I wore it twice then gave it away to Lauren, who says it fits perfectly. I've cobbled the following together from photos and notes I took before I sent it on its merry way. Despite the fitting issues, I learned a LOT from this one!
While I've made several corsets in modern and mid-Victorian styles, teens corsets were something I've never studied or attempted before. Luckily, the fabulous Jo at Bridges on the Body started up a 1911 corset sew along! Her posts cover every part of the process from beginning to end and made tackling this project much less scary. Of course, despite my best intentions I didn't end up sewing along with everyone else at all; rather I got mine started just as everyone was finishing.
I chose to use the Post Edwardian Longline pattern she provided rather than the Corsets and Crinolines one. I wanted this to be as easy as possible and didn't want to deal with the gussets on the latter. I blew up the pattern and made a mockup (forgot to take photos of that apparently). I found that while the waist seemed like it would be OK, my butt ended up super squished. The corset was also too short and needed a touch more room in the top. I raised the top one inch, added an inch to the upper back and two inches to the butt.
 |
| The pattern with my additions taped on |
I was in a hurry so I decided to not make a new mock up to assess the changes. If I had, I would have found that I still needed to add space in the mid hip. I also needed to add a bit to the waist; even though it's the same width as other corsets I own it still doesn't fit right. Since this style has the waistline sitting a bit higher than earlier corsets the tightest part is actually directly on my ribcage where I don't squish so well. When I made the original mock up I thought the reason I couldn't close the waist further was because the hip area wasn't laced anywhere near closed. I thought the problem would be solved by the addition of those two inches at the low hip. Adding to the hips of other corsets I've made has allowed me to lace the waist tighter before (see Cathy Hay's discovery of the extra room effect), so it wasn't a completely stupid assumption. Even so, I should know that when tackling a completely new style of corset one shouldn't assume that everything will work the same!
I made the corset out of cream coutil with a patterned quilter's cotton for the lining. A mustardy organic cotton served as bias binding and covers the garter straps. I had planned to use a matching twill tape for the waist tape but ended up skipping that part. I also bought some golden Japanese embroidery thread with the intention of doing some flossing, but that didn't happen either!
 |
| Well at least I ended up using half this stuff |
Lazyness prompted me to use purchased casing for the boning channels. I should know by know that laziness doesn't pay. The casing can fit two bones side by side, but juuuuuust barely. In order to get them perfect, I had to hand baste the channels exactly where they needed to go, then carefully stitch about 1/16 of an inch in from either edge. Then I could remove the basting stitches and carefully stitch down the exact center. I was a liiiiittle bit off on some and as a result it was difficult to shove the boning in, but I managed.


I screwed up when placing the grommets. I like to punch a tiny hole where each grommet will go, but this time I got overzealous and didn't notice that part of the corset got folded underneath the rest while I was hammering away!
 |
| Whoops! |
Luckily the damage is to the very top part of the corset. It won't be taking much stress at all, and will be covered by lace. Some quick stitching later, the holes were patched and the problem was solved. I highly doubt that anyone would even notice it in the finished corset!
 |
| What? It'll be covered up in the end. |
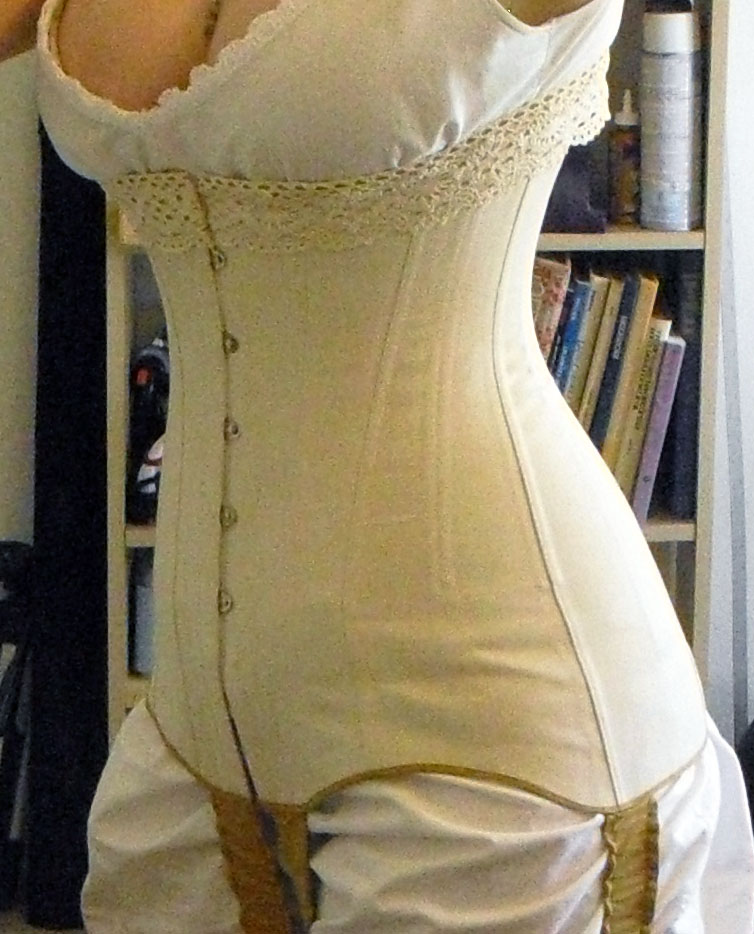
This type of corset doesn't fasten all the way down the front; the busk ends several inches short of the bottom. The bones end around the same point. The two front halves can then open up when you sit or take long strides. This design lets the corset be extra long to provide smooth shaping, but still allows you to move. I loved the long line, but decided I wasn't a fan of the extra fabric over the front of my thighs, nor the super straight line of the bottom. There's also some wrinkling in the lower third; that's because there aren't any garters to pull the edge downwards yet.


To pretty it up I carved out some curves just above each thigh. I bound the edges with a thin bias tape made from the mustard cotton and added some pretty lace around the top. I attached garters at the center front and sides, then clipped them to my stockings to pull the corset into alignment. What a difference!


The back doesn't close as much as I wanted to, but that's what I get for not making a second mockup. You can see that there's a flat spot in the back mid hip where there isn't enough space in the corset and it just smooshes my butt down. The corset isn't laced all the way down because I ran out of silver 00 grommets and had to leave off the last two on one side.
 |
| The poor corset just can't handle all that junk in the trunk! |
Even better, I can sit it it!
 |
| Look at how well it maintains that smooth line all the way down the back! |
 |
| The busk is shorter than the corset so that it doesn't poke, and the bottom front edges split open. |
It certainly gives me the proper shape, and visually it appears to fit well enough. It also encourages the wearer to lean forward ever so slightly, adding to the proper fashionable silhouette. When I first wore it out I thought it was pretty comfortable for the first hour. Unfortunately, after that first hour it became a nightmare to wear! I'm not sure if it's just that the sizing is off, or it's the high placement of the waist that is problematic, or if the style of corset is just not my body's cup of tea. I think that the constant urge to lean a bit forward caused some of the issues. In any case, I learned a lot from this adventure, and the corset is happy in its new home. Everybody wins!
Great job! I actually love the tiny little mistakes. Makes things interesting, more like the antique originals. :)
ReplyDeleteYou look absolutely fabulous in it.
Thanks! I like to think the weird little bits give each piece a story that makes them personal and unique :)
DeleteI never even noticed the extra holes! I haven't worn it for a long period of time yet - haven't had occasion since the ball - but when I tried it on that weekend, it felt like a lovely gentle hug :-) I'm fatter than you - maybe the fitty things will work on my body where they didn't work on yours? Heck, that overbust corset pattern you made did wonders for me, so I can't wait for a chance to wear this Edwardian out-on-the-town.
ReplyDeleteLol, did I forget to point out the holes? Proves my point though, no one can see them! You've got it backwards; I'm fatter than you (I just squish more under the ribs) so I think it will actually fit you better. I bet it looks lovely on you, can't wait to see it!
DeleteI need one of these so badly. This is the hottest thing I have ever seen : p.
ReplyDeleteI am so impressed by your corset skills, It is a mind blowing thing to watch you put these together.
Dude. Still looking for chocolate silk taffeta for your corset. At this point I'll probably have to add an inch to the butt for all that Southern food you've been eating ;)
DeleteNice work. You've mentioned other corsets, I'm trying to research teen stays/corsets in the late Victorian era and I've not come up with much information. Is there a book or place you can point me to for help on this?
ReplyDeleteHello, there is a soft quilted "stay" pattern out from Past Patterns that you might be interested in, it cost about $24 and is very lovely when all made up and hand quilted. This particular corset was more for younger people and for working.
DeleteThanks for the info. I looked on the site and couldn't find it. Just the kind of day it's been for me.
DeleteIf you're looking for info on how to build corsets, then Linda Sparks' "The Basics of Corset Building: A Handbook for Beginners" is a great source of info. "Waisted Efforts" showcases a lot of late Victorian and Edwardian corset images and patterns, but I find the draping instructions are really only good for theater. "Corsets and Crinolines" is a great book to check out as well; it includes corsets from the 16th century through the 19th, gives patterns and images for several examples, and provides historical written references as well.
DeleteVery nice. You had it laced perfectly; you actually DON'T want the lacing to close completely or the corset won't fit like it is supposed to. Love the color combinations, (I do that too, line the coret with fun fabric). I use self bias fabric for the edges rather than bias tape. I used to use flat springs steel but found that it makes the corset too heavy so now prefer the flat white metal boning in 1/4". Again, nice job, well done.
ReplyDeleteThanks! Isn't it fun when you peek at the inside of a corset and there's a cool fabric surprise? ;)
DeleteThe back is actually open about 4" in places, and I prefer a 2" gap. I've got both white flats and spiral steel in this one (I find that the spiral steel is best for kickass curves!) though I could have probably just stuck with the flats.
Beautiful corset! You are so talented to produce corset such beautiful work.
ReplyDeleteThis is a beautiful corset. I've always loved Edwardian corsets and have coveted one of my own for years. Not sure when I'd wear it, but I think it is sexy and ladylike. Do you make them for others?
ReplyDeleteLaura
Thanks! I've always loved the look of Edwardian corsets too. Something about that S-curve silhouette, I suppose. I don't take sewing commissions though, as I barely have enough time to sew for my household :) There are a number of fabulous corsetieres out there, though many focus more on Victorian or Modern corsetry rather than Edwardian. If you're up for making your own, Truly Victorian has a great 1903 corset pattern here. I've used it for another project and found it to be a really good pattern.
DeleteVery interesting post, thank you. I'm a bit late, I've only just found it.
ReplyDeleteThis period 1910 was considered liberating because the wasp waist had gone out of vogue a few years before. As noted, this in this period they were long and often heavily boned - slouching or anything approaching it was not for the real lady!
Somewhere in a vintage newspaper article on the web for around this time advising on the proper corset for day, evening and horseriding. It added that mothers could now take their (13 year old?) daughters to the corsetiere without the fear that they would be tightlaced. I've tired to find it again, but I haven't so far.
Betty
Hello!
ReplyDeleteThe corset you made is absolutely gorgeous.
Do you sell it? or take orders/commissions?
Best regards, and once again, bravo!
Thank you! I don't take commissions, but every now and again when I make a corset or a costume that I decide I don't want to keep, I'll put it up for sale. When I do, I'll post on this blog, so keep an eye out!
Delete